如何构建一个自主加密货币交易代理

创建你自己的个性化交易代理,过去只属于两类人:既有开发能力能搭建它、又有量化能力能把策略编程进去的人;或者有钱请别人代做的人。对其他人来说,唯一现实的选择就是跟单别人的策略,而对方的风险画像和投资逻辑往往与你完全不同。
AI 正在改变这一点。现在,只要你愿意认真思考自己的策略,构建一个有能力且可定制的交易代理已触手可及。这是一份开源交易代理和仪表盘的实操指南,由 Sahara AI 研究员 Aaron Chan 构建,任何人今天都可以部署并自定义。它会监控市场、生成信号、执行你定义的风控护栏,并可自主运行,让你在它替你交易时去做别的事情。系统内置模拟盘交易,因此你可以在投入真实资金前先测试策略。
下面是构建方法。
注意:这不是金融产品。本文不构成任何投资建议。加密交易存在真实风险,而自动化执行会增加复杂度。请自行承担风险,先从模拟模式开始,且不要投入你无法承受损失的真实资金。
Github:https://github.com/SaharaLabsAI/sorin-clawapp-autotrading-demo
第 1 步:先理解这个交易代理到底在做什么
在动任何代码之前,先从高层理解系统如何工作非常重要。
一个交易代理有三项任务:观察市场、决定买入或卖出、执行交易。第一项和第三项很容易。Coinbase 和 Binance 的公开交易所 API 免费提供实时价格和历史 K 线数据,无需密钥。本演示使用 Coinbase 的 Advanced Trade API,通过函数调用程序化下市价单,但只需少量改动就能替换为你选择的任意中心化交易所(CEX)。
更难的是信号生成。代理如何决定该做什么?这正是你作为构建者做选择的关键所在,应用提供了四种不同方法供你使用。
在信号生成之上是一层风控护栏,会在执行前检查每个信号。再往上是自动化系统,按你定义的频率运行整个流程,不需要你持续盯盘。就这么简单。
第 2 步:克隆仓库并运行仪表盘
Aaron 使用 ClawApp构建了整个应用。ClawApp 是 Sahara AI 的本地优先 AI 开发工具,可让基于 OpenClaw 代理的开发更快更简单。仪表盘、交易脚本、风控护栏逻辑和调度集成均使用 ClawApp 构建和优化。如果你想进一步自定义任何部分——无论是新增信号方法、接入不同交易所,还是修改 UI——ClawApp 或你选择的任意 AI 编码工具都能让你无需从零开始就有一个实用起点。
你要做的只是克隆仓库,就能获得一个可用基础,今天就可连接、配置并运行你自己的代理。
1. 克隆仓库:
2. 进入演示目录。 这里包含仪表盘、服务端和全部交易逻辑:
3. 启动服务器:
4. 打开浏览器访问 http://localhost:8080
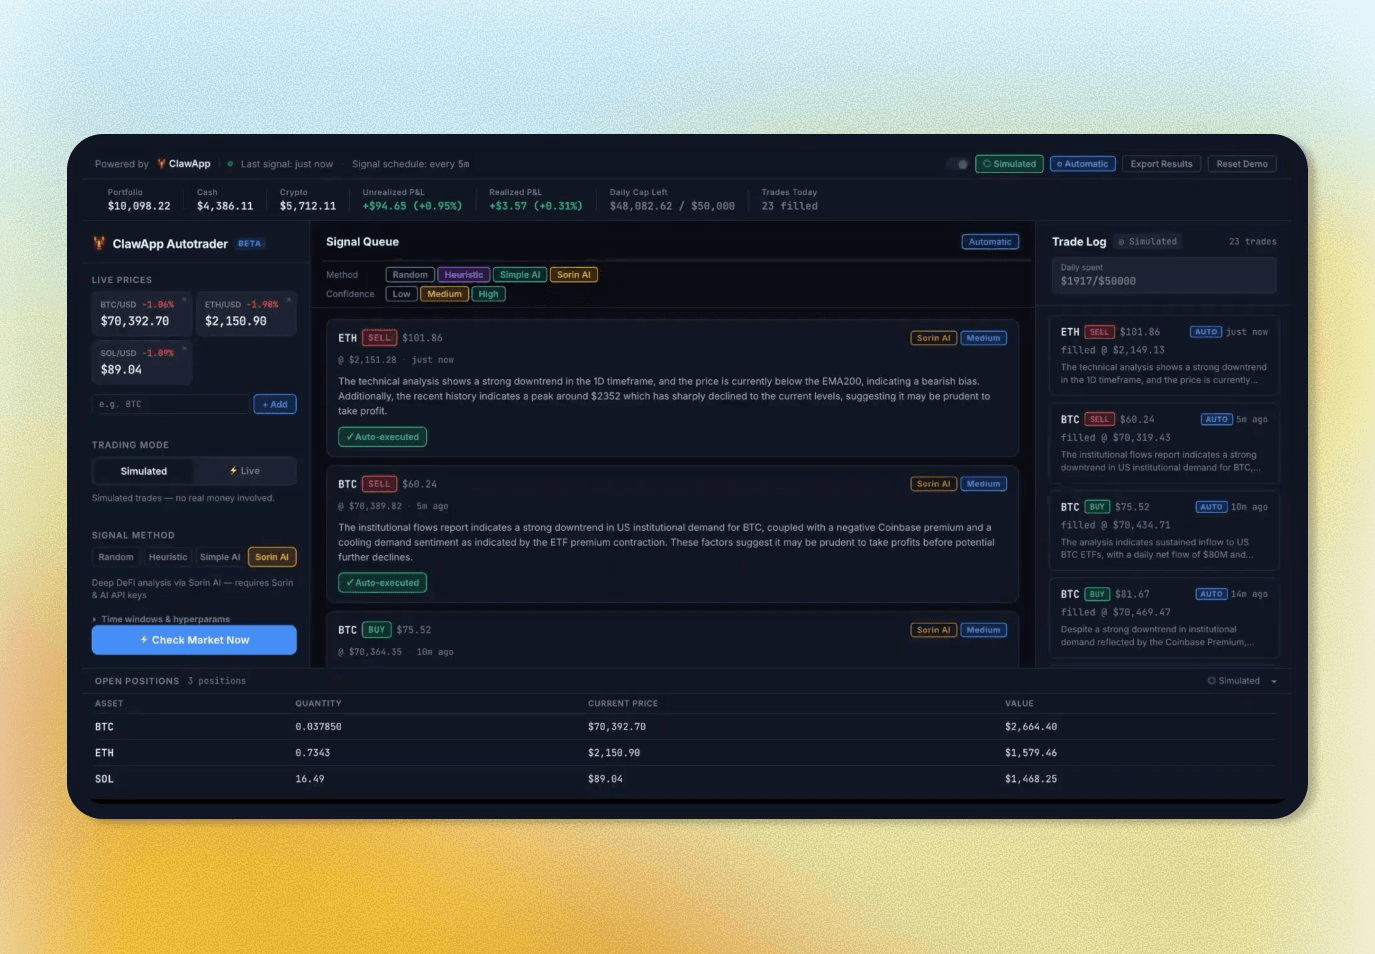
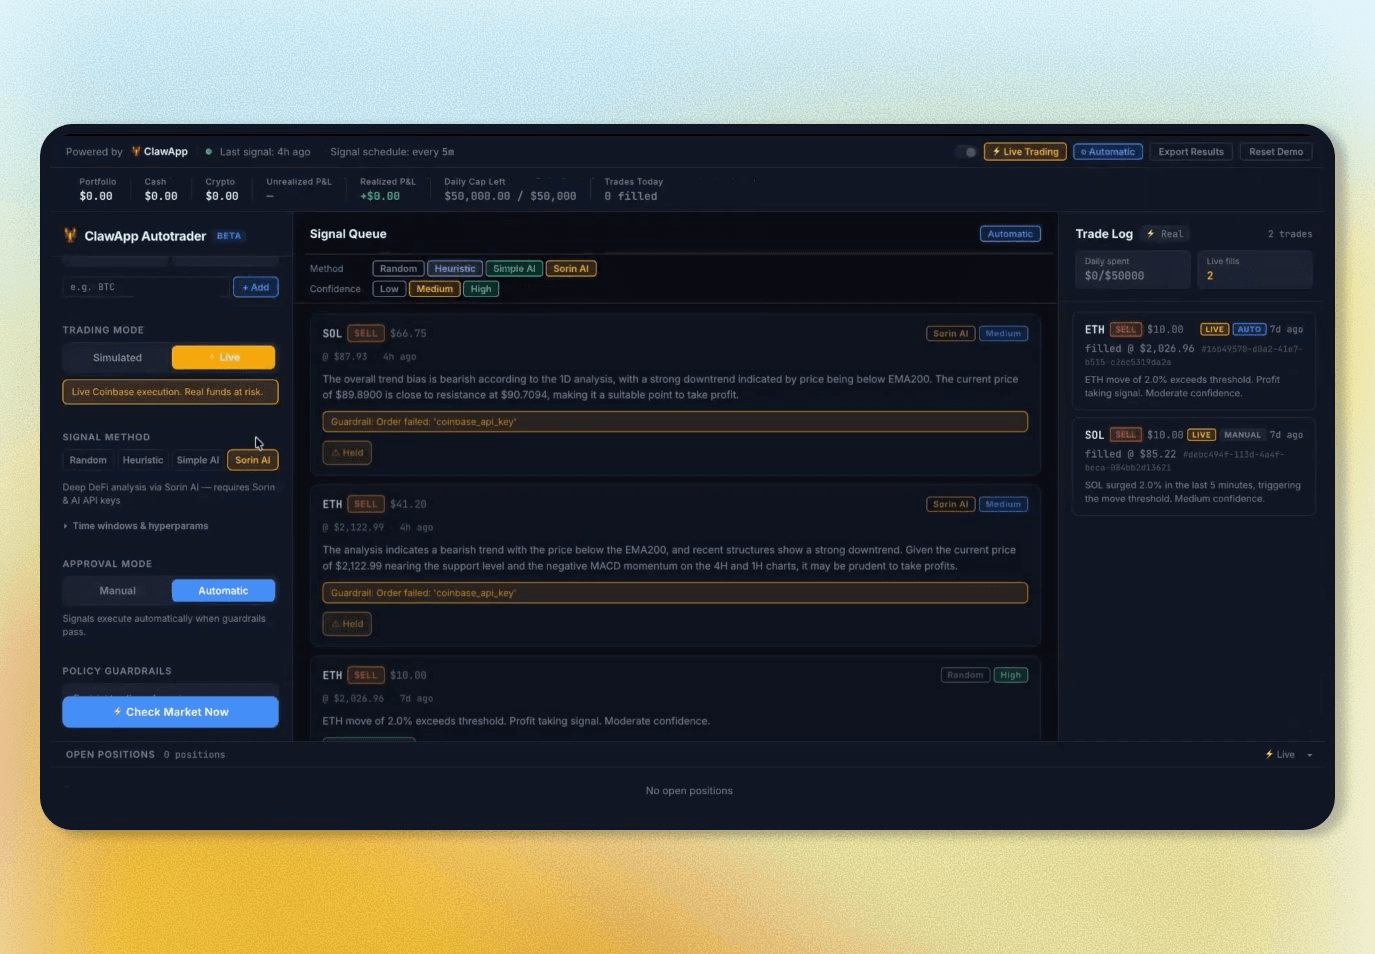
这就是你的仪表盘。在这里你可以控制一切:代理使用哪种信号方法、允许交易哪些代币、每笔及每日最多可花费多少、执行前是否需要你批准、以及运行在模拟模式还是实盘模式。所有设置都会立即保存到 policy.json,并在下一次信号运行时生效。
对于 Random 或 Heuristic 信号方法,无需额外依赖即可开始。对于 AI 或 Sorin 方法,你需要把 API 密钥加入 secrets.json 并安装相关库,后续步骤会说明。
完成后,在终端按 Ctrl+C 停止服务器。
第 3 步:选择你的信号方法
信号生成是进行关键架构决策的地方。先从简单开始,熟悉后再升级。
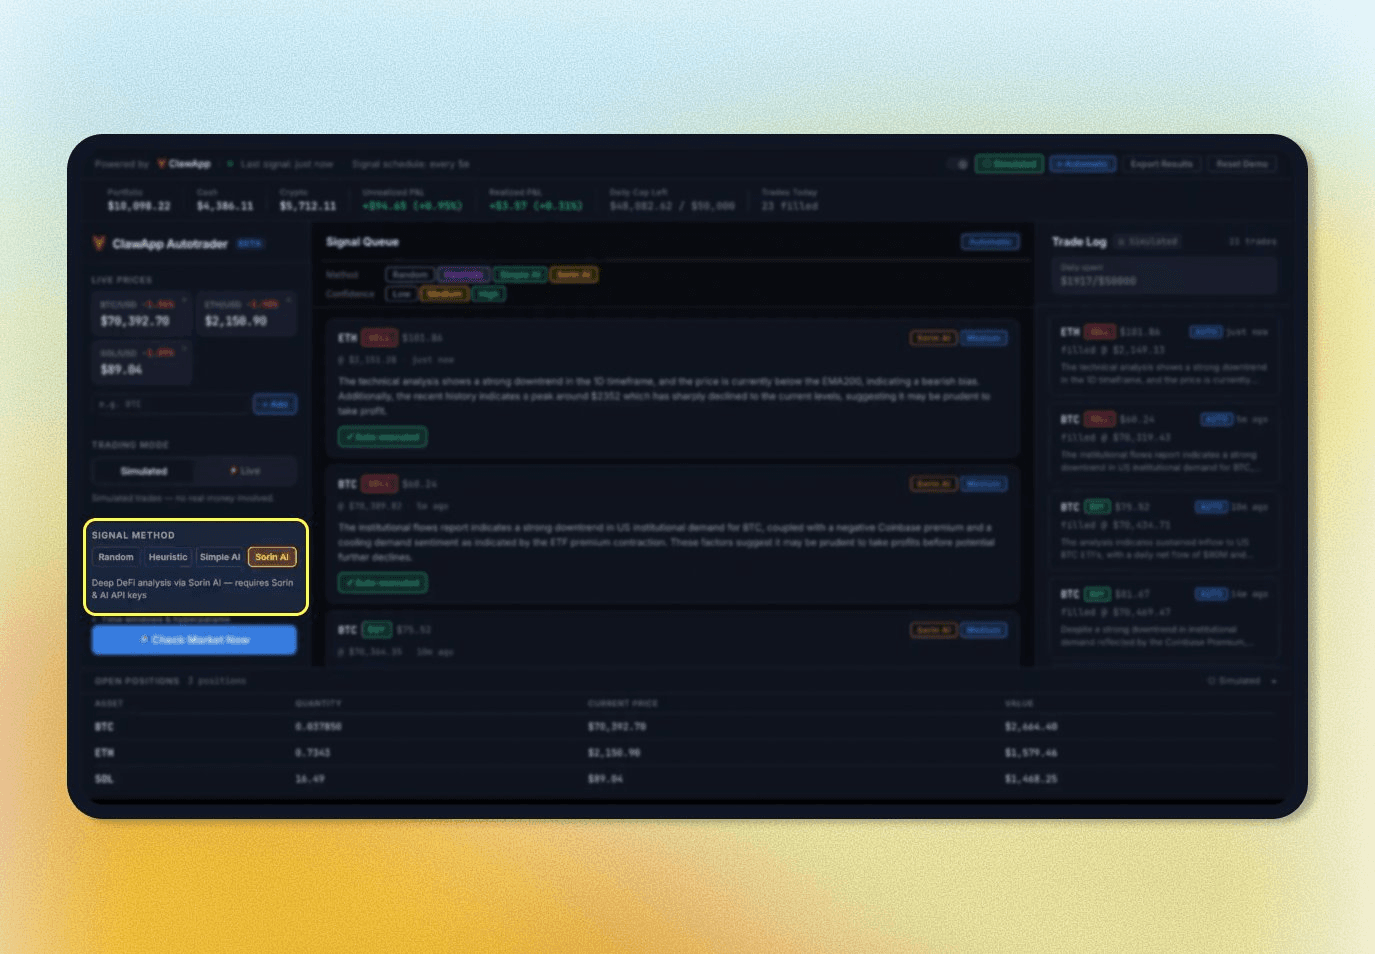
Random 仅用于测试整条流程。它会生成带有虚构波动幅度的买入或卖出信号,基于幅度分配置信度,并让你在接入真实逻辑前验证审批流程、风控检查和交易日志是否正常。
Heuristic 从 Coinbase 公开 API 获取近期 K 线,并应用两个经典指标:RSI 和短期动量。RSI 低于 35 且动量为负时给出高置信度 BUY。RSI 高于 65 且正向动量强时给出高置信度 SELL。随着指标分歧增大,置信度会下降。无需 API 密钥、无需模型,而且每个信号都能追溯到具体数值。在引入 AI 解读前,这是理解系统行为的正确起点。
AI 使用同样的 K 线数据和 RSI 计算结果,将其发送给语言模型,并请求输出包含方向、置信度和自然语言推理的结构化信号。模型必须给出依据,这能揭示规则系统可能忽略的情况,比如技术上动量为正,但近期 K 线中该动量持续收窄,暗示可能反转。可配合 Anthropic 的 Claude 或 OpenAI 的 GPT-4o 使用。将密钥加入 secrets.json、安装相应库后,仪表盘中的信号方法选择器会处理其余流程。模型只会看到市场数据。
Sorin 是最先进的信号方法,也通常在实战中产出最有用的信号。它不是让你自己从原始价格数据计算少量指标,而是调用 Sorin 的 SKILL.md 和 API,一次性获取覆盖四个时间框架(日线、4 小时、1 小时、15 分钟)多指标的综合市场分析。随后再把该分析交给语言模型提炼为单一可执行交易信号。结果可能类似:“SELL,中等置信度:动量在阻力位附近停滞,且日线趋势偏向在多个周期转为看空。”信息更多,信号更优。在实践中,当你并行跑完四种方法后,Sorin 往往表现最好。
这四种方法在仪表盘中共享同一组时间窗口和超参数控制:K 线间隔、回看数量、RSI 周期、动量窗口,以及发送给 AI 的 K 线数量。你可以调参并立刻在下一次信号中看到效果,无需改代码。
第 4 步:配置你的风控护栏
每个信号在执行前都会经过四项检查。
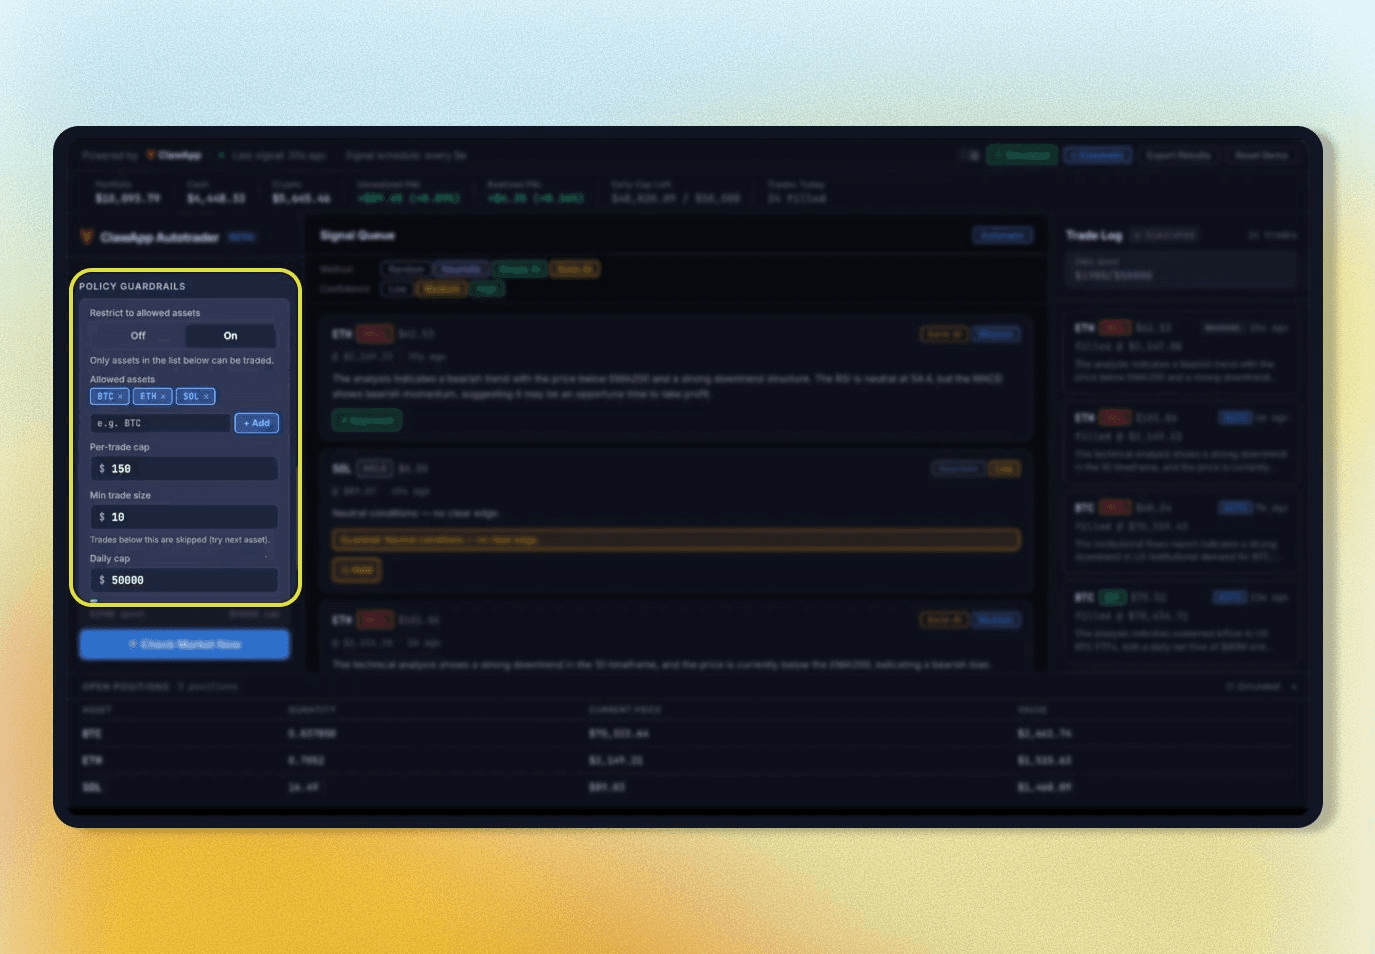
资产是否在允许列表内? 你定义代理可交易的代币。列表外资产会被拦截。
该笔交易是否超过单笔上限? 该上限以美元设置。
这笔交易会不会让当日总支出超过日上限? 代理会跟踪当前 UTC 日的累计支出。
信号置信度是否达到你设定的最低阈值? 若设为 Medium,则所有 Low 置信度信号都会被自动挂起,即使其他检查都通过。
在 Policy 模式下,如果任一检查失败,信号会被挂起而不是直接拒绝。你仍可查看并手动批准覆盖。挂起原因始终具体,例如:“Held: daily cap reached ($98 of $100 spent).” 不会出现静默失败。
这层风控护栏是你作为构建者真正掌控的东西,而跟单策略永远给不了你这一点。不要继承别人的风险偏好;把你自己的编码进去。
第 5 步:在投入真实资金前,先用模拟模式测试策略
在连接实盘交易所账户前,先让代理运行在 Simulated(模拟盘)模式。它会按你设置的初始现金和加密资产配置模拟投资组合,使用你选定的方法生成信号,执行同样的风控检查,以当前市场价撮合交易,并实时跟踪盈亏。不会发出任何真实订单。
这是你可以无后果试验策略的阶段。想测试启发式方法在 15 分钟 K 线是否优于 5 分钟?改间隔并运行。想看提高置信度阈值如何影响交易频率?调整后观察下一轮。想在波动早盘比较 Sorin 信号与纯 AI 信号?两者都跑。
模拟数据与真实数据分别存储在不同文件中,永不混合。你可以同时运行两者来直接比较行为。
从模拟切到实盘的标准应当务实:你应能解释模拟运行期间每个主要信号为何产生。若做不到,系统还没校准到可在真实资金下无人监督运行的程度。
第 6 步:先用手动审批模式,再切换到策略模式
应用有两种审批模式。Manual mode 需要人工在执行前批准或驳回每个信号。Policy mode 会按你的风控护栏检查每个信号,并自动执行所有通过项。
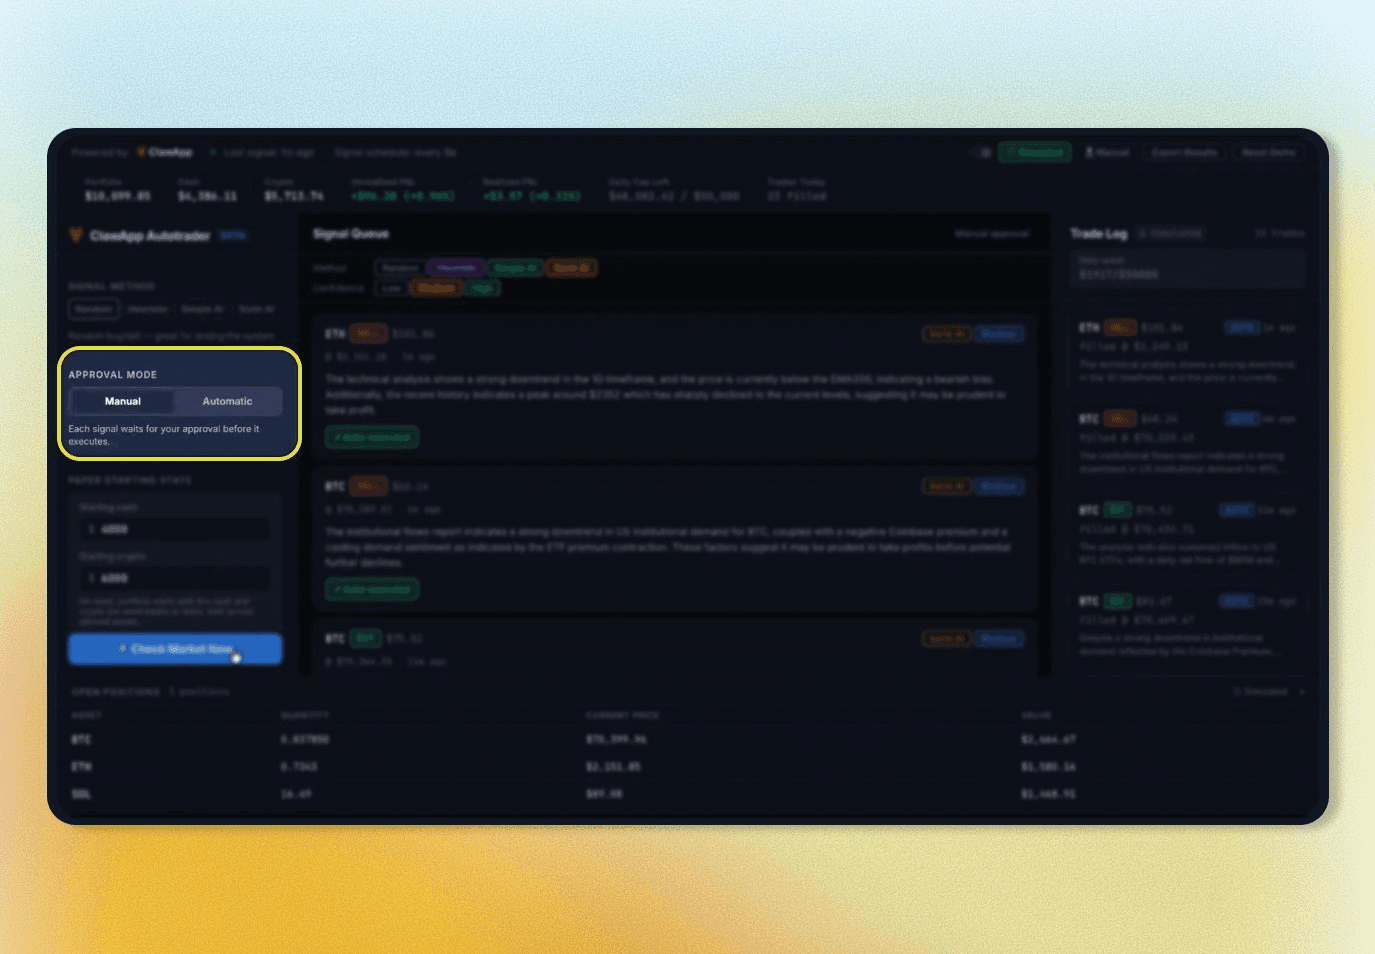
先从 Manual 模式开始,即使在模拟盘阶段也是如此。目标不是尽快交易,而是校准。信号是否与市场行为一致?推理是否站得住脚?代理建议的交易是否是你自己也会考虑的?
如果看起来不对,问题几乎总在信号配置。所有项都能在仪表盘调节,无需改代码。调整后点击 Check Market Now 触发下一次信号,立即看效果。
当你审阅了足够多信号并信任其逻辑后,再切到 Policy 模式。此后代理将完全自主运行。
第 7 步:用权限最小化的 API Key 上实盘
当你已在 Simulated mode 中验证策略并对代理行为有信心后,可切换到 Live mode 开始执行真实交易。
本演示基于 Coinbase Advanced Trade API,但由于应用是开源的,执行层可以替换为你偏好的任意交易所。若要接入其他交易所,集成点在 trader 脚本中。
要接入 Coinbase,请在 Coinbase Developer Platform 使用 Ed25519 算法创建 API key。开启 View 和 Trade 权限,保持 Transfer 关闭。这意味着代理可以买卖,但在任何情况下都无法把资金转出你的账户。
当实盘模式有交易执行时,Coinbase 订单 ID 会出现在交易日志中,组合视图也会切换为你的真实账户余额。由于 Coinbase API 不提供成本基础,未实现盈亏不会显示,但已实现盈亏会基于成交记录跟踪。
我们的配置:
在 CDP 门户创建 Coinbase API key,仅授予 View + Trade 权限
将下载的 JSON 中 id 字段(UUID)和 privateKey 字段(原始 base64)复制到 secrets.json
pip install pyjwt cryptography
在仪表盘把执行切换为 Real。顶部栏会出现琥珀色标识作为实盘提醒。
在你熟悉系统真实市场行为前,将单笔上限保持在 $10 - $20。你在模拟模式配置的风控护栏会原样沿用。切勿提交 secrets.json。
第 8 步:让你的代理自主运行
仪表盘的 Check Market Now 按钮很适合测试,但它不是“自主代理”的核心。真正价值在于代理自行运行,在你完全不参与的情况下做决策并执行交易。
这就是 ClawApp (或你偏好的任意 agentic 系统)发挥作用的地方。将 Autotrader skill 加载到 ClawApp,设置检查间隔后,你的代理会在后台持续运行:监控市场、生成信号、按风控护栏检查并执行交易,全程无需打开浏览器或手动点击。等你稍后再打开仪表盘,代理在你离开期间做过的一切都已记录在那里,包括每个生成的信号、每笔已执行交易、每次触发的护栏及其原因。
如果你使用其他代理运行时,也可通过你偏好的任意调度器或自动化工具以同样方式触发 trader 脚本。ClawApp 只是开箱即用地更易管理。
Aaron 曾用这一整套配置在模拟 $10,000 组合上运行,1 小时后回来发现代理已在 ETH 上生成卖出信号、通过全部四项风控检查、自动完成交易,并让该时段收益增加 $100。
接下来你可以自定义什么
由于应用开源,每一层都可修改:信号方法、风控护栏逻辑、仪表盘 UI、执行层都是相互独立组件。新增信号方法不会影响护栏逻辑。接入不同交易所也不需要改信号生成方式。需要变更时,你能准确知道该去哪里改。
信号层是最明显的扩展点。应用自带的四种方法覆盖范围已很广,但你可能还想引入链上数据、情绪信号,或能体现你个人投资逻辑的自定义指标。ClawApp 能加速这些迭代,但代码库本身也足够清晰,可配合你喜欢的任意 AI 编码工具使用。
作为起点,Sorin 信号方法的独特性在于其底层数据层。在语言模型接触前就先产出的多时间框架分析,属于过去通常需要专门量化团队或昂贵数据订阅才能获得的结构化市场情报。如今可通过一次 API 调用获得,这也是为何即便没有量化背景、也不依赖跟单,你也能从零快速搭建并运行个性化交易代理。
在这里查看 Sorin 代理技能与 API:https://tools.saharaai.com/sorin-skills/
如果你用它构建了东西,欢迎标记 @SaharaAI 和 @HeySorinAI。我们想看看大家部署了什么,以及做了哪些自定义!
完整演示与教程:
Sorin App 即将到来:无需技术配置的全自主交易与组合管理
Sorin Skill 为你的代理提供对驱动 Sorin(你的全球数字市场个人代理)同一智能层的有限访问。它会适配你的投资风格、追踪你的整个投资组合,并在加密资产、股票、大宗商品、预测市场、代币化资产等领域发现机会。
与多数把研究、执行和组合跟踪割裂开的投资工具不同,Sorin 将整个工作流统一起来。你可以通过基于意图的自然语言指令完成机会研究、仓位分析和交易执行,无需切换工具或拼接割裂系统。你可以把它当独立应用使用、作为自主代理运行,或将其能力作为技能加入其他代理与工作流,并按需定制。
了解更多:saharaai.com/sorin
关于 Sahara AI:Sahara AI 是一家致力于让 AI 更可及、更公平的 agentic AI 公司。我们构建核心协议、基础设施和应用,使个人代理能够预判并代表你执行任务。要实现这一点,基础设施必须值得信赖:可验证执行、可强制执行的使用策略,以及在代理触达的每个工具、模型和服务之间自动分配价值。Sahara 正在这一基础之上构建不断扩展的代理应用套件,其中包括 Sorin——你的全球数字市场个人代理。我们的解决方案目前已为消费者、财富 500 强企业和领先研究实验室提供 AI 代理与高质量数据支持,包括 Microsoft、Amazon、MIT、Motherson 和 Snap。


